Adding a Brake Cooling Fan to Your Vanguard XTV
Your Argo uses brakes to control steering, and those brakes can overheat when used in extreme conditions. If you regularly operate in hot summer temperatures, or you use low gear regularly on snow, you may want to add a cooling system to your brakes. Here’s how you can install a cooling fan kit on your Vanguard amphibious ATV.
Tools
A drill with 7/16 and 3/16 inch bits.
A flat head screwdriver
A #2 Phillips head screwdriver
Pliers
A ratcheting wrench with 3/8, 5/16 and 9/16 inch sockets
A torque wrench
A nut driver with 3/8 and 5/16 inch socket
A pop riveter
A wire crimper
A measuring tape, preferably with metric measurements.
Removable threadlocker. Argo recommends 242 Loctite.
A machinist punch isn’t required, but it is recommended.
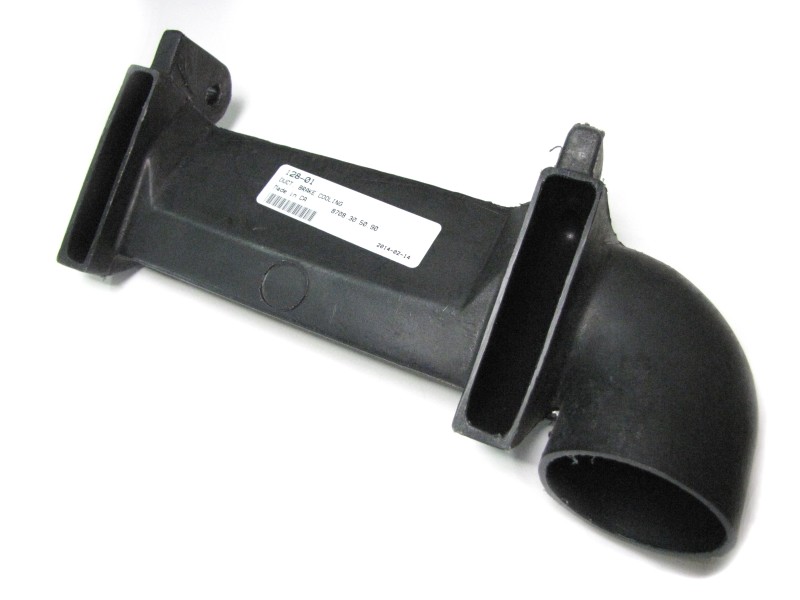
Cooling Duct Installation
1. Remove the hood.
2. Use the 7/16 inch socket to remove the bolts holding the intake duct to the hood support. Some early models also have a spring that can be removed with a 3/8 inch socket. Remove the duct.
3. The cooling duct mounts between the engine and transmission. Check the clutch guard for three holes: two to mount the guard, and one to mount the duct. If you only see two holes, you need to drill your own mounting hole. Measuring from the bottom left corner next to the guard holes, drill a new hole 6.687 inches (17 cm) to the right and 0.375 inches (1 cm) up using the 5/16 inch bit. Use the punch to mark the spot to be drilled.
4. Install the two spacers into the mounting holes on the duct.
5. Remount the clutch guard and driven clutch, applying thread locker to all fasteners. Torque the clutch guard bolts to 30 ft-lbs, and the driven clutch fasteners to 15 ft-lbs.
6. Remove the rear fastener that holds the steering bracket to the transmission side cover. Place the duct between the engine and transmission.
7. Attach the duct to the transmission side cover using the longest bolt in the kit and the matching washer together with the lock washer removed in the previous step. If you’re installing the kit on a 6×6 Vanguard, you won’t have a steering bracket to attach to. Use the four extra washers in the kit as spacers between the brake duct and side cover.
8. Mount the other side of the duct to the clutch guard using the shorter bolt, two matching washers, and locknut.
Fan Assembly
1. Crimp the male terminal to the yellow wire and the female terminal to the black wire.
2. Use the flat head screwdriver to attach the three-inch adapter to the fan outlet.
3. Use the flat head screwdriver and a 3/8 inch nut driver to attach the mounting bracket to the blower fan motor.
4. Connect the flex hose to the adapter. Us the 5/16 inch nut driver to tighten the gear clamp over the hose and adapter.
Cooling Fan Installation
1. Drill 8 3/16 inch holes through the right and side of the upper body near the ventilation louvers. Drill the first hole 11 inches from the back edge of the headlight and 4 ½ inches from the hood. Drill a second hole 4 inches behind the first hole. Drill two more holes 13/16 inches to the outside of the holes you just drilled.
2. Place the intake screen between the flange and the inside of the upper body. Use the four ¾ inch Phillips head screws to fasten the screen. Mount the fan to the holes you drilled in the upper body using the four rivets
Fan Switch and Wiring Harness Installation
1. Drill a 7/16 inch hole 6 ½ inches to the left of the choke knob.
2. Use the Phillips head screwdriver to fasten the eye terminals on the wire harness to the fan switch terminals.
3. Install the fan switch. Use the pliers to tighten it down.
4. Route the fan harness along the main wiring harness and clip it into the pre-installed clamps.
5. Plug the female terminal into the yellow blower fan wire. Plug the male terminal into the red wire. Plug the black wire into the brown wire from the main wire harness.
6. Reinstall the air intake duct and hood.
Using the Fan
Switch the fan on when operating your vehicle in low gear, or in high temperatures. Models with a Briggs & Stratton engine have a 16 amp alternator only generate 4.5 amps at low RPM. Avoid using the cooling fans and headlights at the same time.
We Can Help You Upgrade Your Argo
Shank’s Argo does more than just sell XTVs. We have the OEM parts and accessories you need to get the most from your vehicle. Not comfortable drilling holes in your Argo? Our service department can install a cooling fan or any other accessory you want. Come visit us at 4900 Molly Pitcher Highway in Chambersburg, PA, or visit us online at www.shanksargo.com. We can ship parts and accessories for your XTV to any address in the U.S. or Canada.