XTV Chain Maintenance
Chain Lubrication
Chains should be lubricated every 10 hours of operation or after any time water gets inside the vehicle. If your vehicle has an automatic chain lubrication system, keep it filled with Argo automatic oiler chain lube. Otherwise, apply Argo aerosol chain lube.
Replace the chains
All chains should be inspected and lubricated every 50 hours. Replace the chain if you find any of the following:
The chain tensioner can’t take up the slack.
The chain rubs against the frame.
The chain is seized because it isn’t lubricated or has started to rust.
The chain climbs over the sprocket teeth.
Idler chains on Avenger and Frontier XTVs should also be checked after the first two hours of operation. The chain tension is too loose if there is a banging noise when making turns.
Removing Drive Chains
1. Shift the transmission into neutral (N.)
2. Remove the floor pans.
3. Turn the tensioner cam assembly so that it’s as possible to the cam follower block next to the bottom of the frame. Attach a set of locking pliers to keep the chain from falling off.
4. Push the vehicle until the connecting link on the chain is visible.
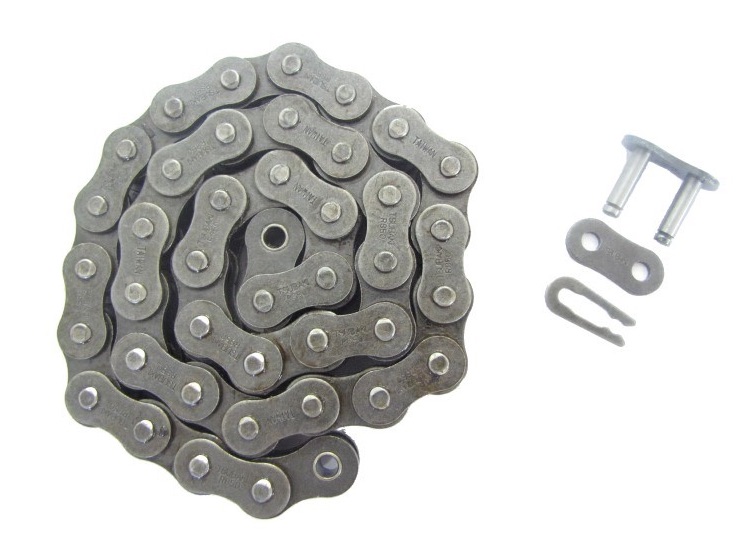
5. Some models have a spring clip that can be pushed off the chain with a flathead screwdriver, while others use a set of cotter pins that can be removed with a set of pliers. Once free, pull the connecting link out to separate the chain. If you’re taking apart an RC50-2 double chain, there will be two inner plates and one outer plate on the connecting link. Single chains will have a single outer plate.
6. Remove the chain from the vehicle.
Installing Drive Chains
Thread the chain over the slider block and around the drive sprockets, then bring the chain together to install the connecting link.
On the RC50-2 double chain, push the two inner plates into the center slot between the chain links, then push the connecting link through the holes in the two chain ends. Place the outer plate over the ends of the connecting link, then push the spring clip over the ends of the link or install a new set of cotter pins.
On single chains, push the connecting link through the holes in the chain ends, then place the outer plate on the end of the link followed by the spring clip or a new set of cotter pins.
Having trouble keeping the end links lined up? Argo makes a set of modified Vice Grips specifically for this purpose.
Chain Tensioning
Under normal conditions, the chain tensioner will automatically ratchet up as the vehicle is used to take up chain slack. Each step of the cam assembly takes up three inches of chain slack.
This tensioning system should be checked every 10 hours of operation. If the chain slack is over three inches, clean the cam assembly to remove any debris that may be keeping it from working. Once everything is moving freely, push up on the cam block to move to the next tensioning position.
Slider Block
The slider block is pushed by the tensioner into the chain to maintain tension. This block should be inspected after every 50 hours of operation. It will need to be replaced once the wear groove, marked on the inside of the tensioner, is ¼ inch thick.
To replace the slider block, do to following:
1. Wind up the tension assembly and remove the chain as instructed above in “Removing the Chain.”
2. Use a set of pliers to pry the block off of the cam assembly.
3. Place the new slider block over the shaft of the cam assembly. Place a piece of wood over the block and hit it with a hammer. This will spread the force over the entire slider block, snapping it into place.
4. Reinstall the drive chain. Push up on the cam assembly to tension the chain.
Replacing and Adjusting Idler Chains (Avenger and Frontier)
1. Remove the firewall.
2. Loosen the two left side clamping nuts on the plate covering the bottom of the transmission.
3. Turn the vertical adjustment bolts, located directly opposite of the clamping nuts, counter-clockwise to raise the transmission and tighten the idler chains.
4. Reinstall the clamping nuts, torquing them to 80 lb-ft.
If you need to replace the chains, after step 2, use the same methods needed for removing and install drive chains.
Getting Parts and Service for Your Argo
Need specialty tools or chains for your Argo? Visit Shank’s Argo, located at 4900 Molly Pitcher Highway, Chambersburg, PA. We have a wide variety of Argo parts and accessories. Want to schedule a test drive? Visit us on the web, www.shanksargo.com.